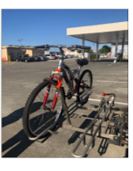
Bring your bike with you
How to Use the External Bike Racks
Click here to view Video on how to use external bike racks
NOTE: FOR YOUR SAFETY, LOADING AND UNLOADING OF BICYCLES SHOULD BE DONE FROM THE CURBSIDE OF THE BUS.
Steps for Loading Bikes
- Prepare your bike for loading. Remove water bottles, pumps, panniers, saddle bags, and other loose items that could fall off while the transit vehicle is in motion.
- Inform the transit operator that you will be loading your bike. You must load your bike from the curb or from in front of the transit vehicle. Do not step beyond the driver’s side of the vehicle into passing traffic to load your bike.
- If the rack is in the stowed (vertical) position, squeeze the latch handle to release the latch, then fold the bike rack down. You need only use one hand to unlatch and pull the bike rack down, so that your other hand is available to hold your bike. It is not necessary to lean your bike against the transit vehicle.
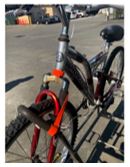
- Lift your bike onto the bike rack, fitting your front wheel into a wheel slot labeled for a front wheel. The purpose of the directional placement is to make adjacent bikes easy to load and unload.
- Raise the Support Arm Hook over the front tire. The primary purpose of the Support Arm is to keep the bike secure while the transit vehicle is in motion. Some bikes may sit in the wheel tray without use of the Support Arm, but the rack must not be used without the Support Arm.
The Support Arm Hook must be between the highest point of the tire and the head tube. Incorrect Support Arm Hook placement may result in the bike falling from the rack, potentially damaging the transit vehicle or other vehicles. Place the Support Arm Hook over fenders as required to achieve the correct hook position. Some bike accessories such as front racks and baskets with vertical support stays may preclude correct hook placement. Bikes with accessories that conflict with correct support arm placement must not be loaded onto the rack.
- Secure the bike with the orange wrap strap around the fork of the bike (or other accessible component) and stick hook and loop back to itself. Wrap the velcro strap around support arm handle as shown.
- Board the transit vehicle and enjoy the ride! Choose a seat near the front of the vehicle to keep an eye on your bike. DON’T FORGET you have a bike with you when you get off at your stop.

Bike Rack Dimensions: Bike Weight:
Length (max): 61.0in Weight (max): 55lbs
Tire width (max): 2 ¼in
Steps for Unloading Bikes
- Inform the transit operator driver that you will be unloading your bike as you approach your stop. Use the front door to exit the transit vehicle. Unload your bike from in front of the vehicle or from the curb, not from the street.
- Remove the Orange Velcro Strap and raise the Support Arm Hook up and off the tire and return it to its stowed position.
- Lift your bike out of the bike rack.
- Fold up the Bike-Rack for Buses if there are no bikes on the rack and no one else is waiting to load their bike. The bike rack will lock into place in the stowed position.
- Step away from the transit vehicle with your bike onto the curb.
If your bike is accidentally left on the bus, please contact our office at 707-443-0826. The office is located at 133 “V” Street, Eureka and open between Monday – Friday from 8am – 4:30pm.
Liability
Bike racks are provided as a convenience to bus riders. Humboldt Transit Authority is not responsible for: the theft or loss of bikes; damages incurred to bikes while on the transit system or at a bus stop; damages to bikes during loading or unloading; or injury to the rider during loading or unloading a bike. Riders will be responsible for any damages or injuries to third parties caused by the rider or bike while loading or unloading the bike, or failing to secure the bike on the rack correctly.